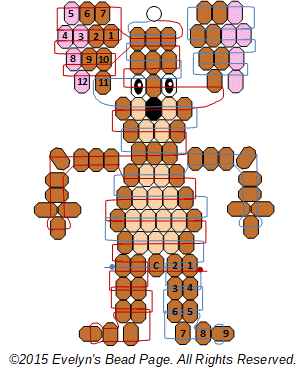

Materials:
3
yards ribbon, cord or plastic lacing
1 key ring or lanyard hook
73 light brown pony beads
16 tan pony beads
10 pink pony beads
2 white pony beads
1black pony beads
Black and white sharpie markers or paint
pens for drawing on eyes.
Special Instructions: Pay close attention to the string path when making the ears and legs. I have numbered the beads to make it easier.
Help with the Ears:
After making the first normal row (3 beads), use one strand to lace on 7 beads
in this order: 2 brown, 3 pink and 2 brown.
Go back through beads 1-4. Then
lace on 5 more beads, 1 pink, 3 brown and 1 pink. Go back through beads 8-10
and then back through the
first row of 3 beads. Repeat to make the other ear
with the other strand. Continue with the pattern.
Help with attaching Ears: After completing the row with the eyes, go through the brown bead, (bead 11) of the ear to attach it close to the head.
Help with the Legs/Feet: After completing the last row of the body, lace 9 brown beads onto one strand. Go back through bead 8, skip bead7, go back through beads 5-6, then 3-4, and 1-2. Repeat process for the other leg. When legs are complete, lace one bead (marked with a “C”) onto either one of the strands. Finish completing this row by going through beads 2 and 1 of the opposite leg. The strand without the center bead will go through that bead plus beads 2 and 1 of the opposite leg. Tie knots.
©Terms and Condition of Use: These patterns are copyrighted and provided for your own personal or non profit use at no charge and with no guarantee. Patterns are NOT to be sold. If copies of these patterns are made, they should retain the original format including the credit line and these terms of use. Please do not link directly to the patterns, but rather to EvsBeadieCrafts.com